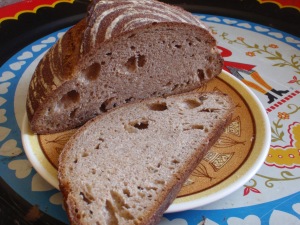
100% wild-cultured sourdough, 100% Texas flour
As much as I enjoy the tastes and textures of most whole grains (brown rice, my least favorite, being somewhat of an exception), I have known for a few years that some compounds in entire grains can interfere with mineral absorption (see excerpt from Sally Fallon’s Nourishing Traditions). Certain preparations, such as sourdough cultures, neutralize the “antinutrient” properties of whole grains, and therefore increase their nutritional value. For this reason, and because I was inspired by AustinUrbanGardens‘ “No Grocery Store Challenge for a year,” I embarked on a wild sourdough project using Richardson Farms locally-grown whole wheat flour.
The freshness of Richardson Farms flour promotes a fecund medium for capturing and cultivating wild yeasts, so the starter cultured readily. Bakers know that whole grain flour dampens a bread’s rise, however, so while I fed my starter the whole grain goodness, I employed the sifting trick to obtain a lighter flour for building my boules (see Texas Bread). Removing most of the bran afforded a stronger structure that could raise a respectable loaf without additional ingredients.
The sourdough process is involved and takes its own sweet time, but the baker is rewarded with a sweet (or sour!) and wheaty tasting bread that keeps well. You’ll be surprised at the nutty and toasty flavors you’ll taste, unhidden by the emphatic flavor of commercial yeast.
I gleaned this method from the King Arthur Flour Whole Grain Baking book, a terrific resource for learning to incorporate whole grains into all your baked goods, from pancakes and quick breads to yeasted goods, cakes and pastries.
I recommend using weight measurements for this project. The volume of the sourdough starter changes as it’s manipulated, making volume measurements approximate at best.
ALL-TEXAS SOURDOUGH BREAD yields 2 small naturally leavened loaves
- 9 ounces Richardson Farms fresh-ground whole wheat flour sourdough starter, refreshed and ready to raise your round. See instructions below.
- 17 7/8 ounces sifted Richardson Farms whole wheat flour, most of the bran removed
- 1 ½ cups cool water. I prefer filtered water for sourdough loaves.
- 1 Tablespoon local honey. I buy Good Flow wildflower honey in bulk at Central Market. I bring in my own jar (widemouthed—the jar, that is) and have the staff tare the weight for me. Lucky Central Texans enjoy many apiary options. Use your favorite.
- 2 teaspoons salt. I like Real Salt.
Combine the first three ingredients. I recommend a stand mixer (with the paddle attachment) but you can use a large wooden spoon. Mix just until the ingredients are well combined and all the flour is moistened. Cover the bowl and let the dough rest for 20 minutes. (This resting period is called “autolyse” and allows the dough to begin developing its gluten).
Stir in the honey and salt and knead on medium-low speed for 2 minutes with the stand mixer and probably 4 minutes if stirring by hand. The dough will look rough and still be very sticky. Cover the bowl and let the dough rise for 45 minutes.
Scrape the dough out onto a floured surface. I like to use a silpat or other nonstick mat. With well-floured hands pat the dough into an approximate rectangle. Facing a long edge, fold the sides in like a business letter. Use your dough scraper or a bench knife to help lift the sticky dough. Brush away any excess flour. Rotate the dough to face the long edge again and repeat the tri-folding, again brushing away excess flour. Place the dough seam-side down back into the bowl, cover and let rise another 45 minutes.
Repeat the folding and let the dough rise for another 45 minutes. The dough won’t look like it’s doing much, but that’s OK. Scrape the dough out onto a floured surface again and use your bench knife or a sharp chef’s knife to divide the dough in two. Cover the dough and let it rest for 20 minutes before shaping.
I use a brotform to support the dough in its final rise, but I have only one. I improvise another using a well-floured tea towel and a medium-diameter colander (about 9″ across). Whatever you’re using, flour it up very well now. Pull the sides of one dough portion into the center and pinch the edges together to form a round. Place the dough ball seam side down on a smooth surface—I use my unfloured counter top. Gently cup the dough with your hands and roll the round in a circle to tighten the dough’ surface. You want the bottom of the dough to grip the counter to help pull the top taut. Don’t get too worried about perfection here. Do your best and remember that bread baking, like everything else, becomes more intuitive with practice. Place the dough seam side up in your prepared brotform, banneton or colander. Repeat with the second dough portion. Cover the formed loaves and let them rise for 2½ hours.
Meanwhile, about 45 minutes before baking time, load your oven with a large baking stone and a small cast iron skillet and preheat to 450º. My baking stone isn’t quite big enough for these two loaves so I augment with my small toaster oven baking stone. Together the two provide ample surface area for this recipe. If you don’t use a microwave oven, put a little saucepan with a scant cup of water in it on the stove over low heat to get it hot. You’ll be steamin’ these loaves at the beginning of baking.
When the rising time’s up, turn each loaf out directly onto a sheet of parchment paper (I use If You Care brand). I press the parchment onto the dough and support it with my hand as I upend it. Then I carefully lay the dough onto the counter. Repeat with the second loaf. Gently brush away excess flour from the surface of the dough. Using a very sharp paring knife or lame, slash the top of each loaf. I’ve been cutting a kind of crosshatch pattern and am not satisfied with that. At this point I’d recommend a large “X”. Of course it’s your signature, so slash as you please. Cut about ¼” deep. Heat up a scant cup of water in the microwave unless you’ve got a pan of water on the stove.
Using a pizza peel or cake lifter, slide the loaves onto the preheated baking stone(s). Quickly pour about ½ cup hot water into the skillet and shut the door. Bake for 15 minutes. Turn the oven down to 425º and continue baking for 25 to 30 minutes, until the loaves are well-browned and feel very firm. If you want to check the doneness of the breads using an instant-read thermometer, you’re looking for 210º.
Place the loaves on a cooling rack and let them cool completely before slicing. Actually I never wait that long. The crust is just too good and crunchy when the bread is hot. Get the butter out!
RICHARDSON FARMS TEXAS-GROWN WHOLE WHEAT SOURDOUGH STARTER
- 4 ounces Richardson Farms whole wheat flour
- 4 ounces cool filtered water
I like to keep the starter in a yogurt-style (tall) 1-quart clear plastic container. That way I can see the action and the starter has room to rise. I stir the flour and water together with a fork and cover the container with a piece of plastic secured with a rubber band. Place the container in a 60º to 75º spot (good luck!) and let it culture for 24 hours.
Remove all but 4 ounces of the starter and stir in another 4 ounces of flour and 4 ounces of water. Let the mixture do its thing for another 24 hours again. Repeat again.
Now you should have a tangy smelling actively bubbling starter. Begin refreshing your sourdough on a 12-hour schedule. After two days you should be able to raise a couple loaves. Twelve hours after the last feeding you are ready to prepare the above recipe .

lavash shards
By the way, I never toss out the discarded portion of the sourdough. That’s way too much waste for the Frugal Foodie! I keep it in the fridge and have used it to make otherwise unleavened tortillas with Dai Due‘s lard (more Rorschach than round, delicious nonetheless) and lavash—the tang of the cracker exquisitely accented by ajwain seeds. In baking my usual breads, I find I can replace some of the flour and water with this surplus starter. Because the weights of the components are equal, I can easily calculate and reconfigure a recipe.
Waste not!
