Savor The Earth

eat tastier, eat greener, eat cheaper

King Arthur’s Coconuts–No Bleach! October 30, 2009

Filed under: cake,dessert — Austin Frugal Foodie @ 7:31 pm

King Arthur unbleached cake flour blend

pretty please with chocolate on top

LET ME EAT CAKE!!!

My favorite dessert is cake.  Light and fluffy, meltingly moist or hearty with produce and nuts, frosted or not, cake calls to me.  And I answer “Yes!” every time—as long as it’s honest.  For me, honest ingredients don’t include artificial flavors and preservatives, hydrogenated fats or GMO ingredients.  I bake a scratch cake at least once a week so when I noticed some months ago that I’d run out of cake flour (always chemically bleached), I decided to work with alternative flours.  Bleached cake flour will almost always yield the softest, fluffiest and most tender crumb in a cake.  As I enjoy the full flavor and toothsome texture whole grains can deliver in baked goods, I consider my adapted recipes to be superior, even if somewhat coarser (although if a cake comes out too coarse, or otherwise texturally faulty, that’s not a success.)

Now King Arthur Flour has come out with an unbleached cake flour product (not organic, though).  A blend of soft wheat flour, malted barley flour and unmodified cornstarch, King Arthur promises “medium-fine” textured results.  I bought the two-pound box at Whole Foods for $4.99.  I’ve made two different cakes with this flour, and both turned out with a quite acceptable crumb.  If I hadn’t mentioned the flour to any of the lucky tasters, no one would have suspected a thing.

For my first experiment, I chose the Heavenly Coconut Seduction cake (coconut milk version) from Rose Levy Beranbaum‘s new Rose’s Heavenly Cakes book.  A gorgeous work,  almost every cake is illustrated in full color on a full page.  For the cake baker, this treatise delivers an education in cake composition, construction and craft.  I highly recommend it!

With the King Arthur unbleached cake flour blend, the coconut cake baked up a little denser and slightly more resilient, less yielding.  Still, for any dessert lover confronted with this moist flavorful layer (sans topping…I’m not Supermom!), the texture was much better than acceptable.  Beranbaum notes that the original version, which calls for cream of coconut (CocoLopez, which I don’t use) MUST be made with bleached cake flour or the structure will dip dramatically in the center.  She knows cake chemistry, so, trusting her judgment, I tackled the recipe with Whole Foods 365 organic coconut milk (not light!).  A winner!

I baked another coconut cake with KA’s cake flour blend, this time using the creaming method (Beranbaum’s cake, like most of her butter cakes, utilizes the two-stage mixing method).  Fantastic!  Moist and tender, this flavorful layer exhibited no textural shortcomings.  I tried not to eat the whole thing.

So far (that is, two cakes into it), I can recommend King Arthur’s cake flour blend.  I haven’t tried it in sponge cakes, yet.  I expect good results, though, and of course I’ll keep you posted.  I can’t wait ’til King Arthur comes out with the organic version!

almost too good to frost

COCONUT CAKE makes one 9″ layer

  • 4 ounces (1 stick) butter, softened.  I like Organic Valley.  Click for a $1 OFF coupon.  Beranbaum recommends this brand as well, and she’s not even biased towards organics.
  • 2/3 cup organic coconut milk (not light), well-shaken and close to room temperature.  Whole Foods 365 is great and a great buy.
  • ¾ teaspoon vanilla extract
  • 1/2 teaspoon natural coconut extract or ¼ almond extract (optional)
  • 2 local eggs, close to room temperature, lightly beaten.
  • 200 grams (1 cup) organic sugar.  You can find this in bulk departments at our natural grocers and Central Market packages their own brand for $2.99 for a 2 pound bag.
  • 167 grams sifted King Arthur Flour cake flour blend. That’s about 1 ¼ cups plus 1 Tablespoon (sift into your measuring vessels).
  • 1 teaspoon plus a heaping ¼ teaspoon baking powder, sieved.  I use Rumford non-aluminum baking powder.
  • heaping 1/8 teaspoon salt

Get your oven heatin’ to 350º.  Grease up and flour a 9″ round cake pan (at least 2″ tall).  I mixed up some “pan prep” recently, combining coconut oil (you can also use ghee) and all-purpose flour until I got a spreadable paste that I can brush onto cake pans.  It’s very handy and works well, and eliminates a can of baking spray.  I like to put a baking strip around the pan to help the cake cook evenly.  For a cute DIY tutorial on baking strips check out littleladycakes.com on Youtube.

Using a stand mixer (my preference) or a hand mixer, gradually cream the sugar into the butter until light and fluffy.  Scrape down the sides and bottom of the bowl with a flexible spatula a couple of times to ensure that the mixture is evenly incorporated.  Gradually beat in the eggs, scraping the bowl as necessary.  Beat for another minute to achieve a very light, fluffy homogeneous mix.

Combine the coconut milk and extracts.  Beat the dry ingredients into the batter in three parts alternately with the coconut milk, beginning and ending with the flour mixture.  Scrape the bowl with your spatula after each addition to ensure the ingredients are well-incorporated.  Pour the batter into your prepared pan (if you’re not using baking strips, the cake bakes more evenly if you mound the batter up around the sides a bit) and bake for about 36 minutes, until the cake tests done (a bamboo skewer inserted into the center will come out clean.)

I usually don’t have time for frosting these days.  We didn’t miss it.  But anything from milk chocolate ganache, whoop cream, coconut or vanilla buttercream, or even a simple coconut milk glaze could guild this lily.  Now you can leave out the bleach!


October Spring—only in Central Texas… October 24, 2009

Filed under: easy,sunset valley farmers market,vegetables — Austin Frugal Foodie @ 10:14 am

…or maybe California.  Walking the dog along the woods this morning, we spied a stand of bluebonnets in bloom.  I guess the months between May (June? July?) and February are getting shorter and shorter.  A welcome sight of spring in the middle of autumn.

Another spring delicacy you can find at Sunset Valley Farmers Market right now is McKemie Homegrown‘s asparagus.  That’s right.  Asparagus.  In Central Texas.  In late October.  At $5 for a ½ pound bag, it’s not cheap,  but I managed to find the funds to pamper myself a bit.  Luckily I had packed an extra fiver.  I can’t wait to toss these fronds with a little olive oil and roast ’em up in the toaster oven at highest heat.  A little salt.  A little pepper.  That’s all they’ll need after that.  My kindergartner’s palate seems to have matured somewhat since the spring, because last week we shared our fall surprise.

McKemie expects to bring more asparagus to market next week.  Grab a taste of spring before the spring crop comes in—Ha!


Belated Bun Bonus October 23, 2009

Filed under: bread,Chinese,vegetarian — Austin Frugal Foodie @ 5:49 pm
steamy blooms

steamy blooms

savory bouquet

savory bouquet

I was starting to feel guilty for not having posted the bonus recipe from my Steamed Goat Buns entry.  So I went back and checked and it’s only been six weeks!  What with the weather change (finally!) and all this mommying I thought I’d steamed my buns months ago.  I guess I’m not that late after all.  I’ll just pretend I timed this post to coincide  with my mention of South River‘s wonderful organic miso in the last recipe.  Plus I happen to already have the requisite photos on my desktop and with our camera on the blink (get well soon, Mr. Olympus), I can post-with-images, like a respectable blogger!

STEAMED BUNS BONUS:  Savory Flower Rolls yield varies

  • South River organic white miso, or your favorite brand and style.  I bought mine at Whole Foods.
  • toasted sesame oil.  Spectrum bottles an organic version.

I made these flower rolls with excess steamed bun dough for which I had no more filling.  Mix together your miso and some sesame oil to taste.  You want a spreadable yummy blend.  Maybe four parts miso to one part oil.  Just taste as you go.  The amount required will depend on how much dough you have to fill.  You can make an entire batch of flower rolls if you want.  Any leftover miso filling can be stirred into stir-fries, rice or noodles, so don’t worry about mixing up too much.

Roll out your dough into a rectangle about ¼” to 1/3″ thick.  Spread the miso paste all over the surface (I use a small offset spatula, but the back of a  spoon will work.  I’m sure you’ll  find an adequate implement.)  Roll up the dough to enclose the filling, jelly roll style, starting with a longer edge.  Using a sharp knife, cut the roll into about 1″ segments.  Stack two segments on top of each other, cut sides facing you (and, obviously, the other cut sides facing away from you).  Place an oiled bamboo skewer on top, perpendicular to yourself, and press down to squash out the roll fore and aft.  Slip out your stick.  Pick up the roll and pull the left and right sides down to meet each other on the underside of the bun.  Pinch these ends together.  This kind of fans out the floral layers on the top.   There’s more than one way to flower a bun, but I like the bloom this technique (from the irreplaceable Barbara Tropp‘s indispensable reference, The Modern Art of Chinese Cooking) delivers.

Btw,  I’ve seen Chinese Flower Rolls blogged-up recently.  For a striking wasabi-fllled roll (using a more traditional dough recipe and a different forming method), check out the “Bread Baking Babes”  Lucullian Delights and Bake My Day.

From here on out, the process is just like making other buns.  So I’m simply copying much of the relevant info here from my goat buns post.  You’re going to form the rolls, let them rise and then steam them.  Easy peasy.

Cut out 20 approximately 2″ X 2″ squares of silicone-coated parchment paper.  I use If You Care brand unbleached parchment, available at Central Market and Whole Foods.

Set each formed flower atop an individual square of parchment paper and place on a baking sheet. Repeat with the remaining dough.

When you’ve rolled all your rolls, cover them loosely with a piece of plastic wrap (or green alternative, such as a large aluminum roasting pan), and let them rise until springy to the touch, about 30 to 60 minutes.  The timing will depend on the usual doughy factors such as ambient temperature and humidity.

Towards the end of risin’ time, get a 10″ diameter (to match your steamer basket) pot of water boiling.  Use plenty of water ’cause you’ll be steaming your buns for 15 minutes.  Place each bun, still on its parchment square, into the steamer baskets, leaving about 1 ½” between them, to allow for their expansion.  Stack your steamer atop your boiling pot—be sure to place the lid on the steamer—and steam for 15 minutes.  Remove the entire contraption from the heat and WAIT for 5 minutes before slowly opening the lid away from yourself (so’s not to get a face full of hot steam).

Your buns are hot and ready now!  Store leftovers in the fridge and reheat them by steaming for another 15 minutes.


Gettin’ Saucy

Filed under: bread machine,easy,pizza — Austin Frugal Foodie @ 1:16 pm

Was it Thursday again?—Already?  These weeks just fly right by.  I’m always smearing our pizzas with some sauce concoction or other and today the combination of ingredients umamified my pies such that I had to share the” recipe”.  No pictures today.  Our camera’s battery broke so we sent it to the vet—I mean camera doctor.

For saucing three pies:

  • ½ cup toasted almonds or other nuts.  Newflower Market is still selling bulk organic almonds for only $6.99 a pound.  Local pecans are in season now, available at our farmers markets and Navidad Farms.
  • 1 or several garlic cloves.  I’m still buying elephant garlic from Hairston Creek FarmMorning Glory Farm may show up with more of the stinking rose tomorrow.
  • 2 ¼ to 2 ½ ounces arugula (about 4 cups, loosely packed).  Flintrock Hill sells conveniently bagged rocket.
  • 2 teaspoons turbinado sugar.  I buy this in bulk at Central Market.
  • 3 Tablespoons dried basil or about a ½ cup fresh.
  • about ½ cup pitted olives.  I used spiced oil-packed black olives (on clearance for $1.99 a jar at CM.)  Other varieties will work.  Check out Texas Olive Ranch‘s Texas-grown olive offerings at our farmers markets.
  • 1/3 cup organic miso, any style.  I used South River sweet white miso from Whole Foods.
  • 1 28-ounce can organic whole tomatoes—I like Muir Glen, preferably “fire-roasted,” drained, crushed with your hands and drained some more.

I put everything except the tomatoes into the food processor and let ‘er whirl.  Then I stirred in the toms.  Add more salt if necessary.

I slathered the crusts, which I made with organic whole gain spelt flour (at a little less than half the total flour called for) and organic all-purpose flour—see Pizza 1.5 for basic recipe.  I used a touch more water for this batch, which yielded a lively, bubbly dough that baked up brown and crisp as all get out (I added a minute or two to the baking time because of the looser sauce and moister dough.)  So if you find some whole spelt flour in your freezer, try it out for your pizzas!

Dusted with reggiano and dotted with mountain gorgonzola (a freebie from work), peppered with sliced local red jalapenos (for the grownups) and feathered with frills of sliced local red onion (napped with olive oil), this week’s umami-pies tasted almost meatily satisfying.

I know it’s only Friday, but who says you can’t bake pizzas on the weekend?!


Bratwurst Supper Redux October 20, 2009

Filed under: Dai Due,easy,fast,leftovers,meat — Austin Frugal Foodie @ 12:36 pm

With about a third of the previous night’s Sausage Skillet Supper remaining, I gave the leftovers a makeover.  Easy and good.  And with plenty of Dai Due‘s Wurtenberg bratwurst still in the pan, nobody complained.

SAUSAGE SKILLET SUPPER REBOUND serves several

  • about a Tablespoon yummy fat.  Roasted poultry fat (save it in the freezer) or good quality lard are the best options here.
  • 2 bunches of radishes, with leaves.  Hairston Creek Farm has begun harvesting their peppery pink orbs.
  • one  good sized tart apple, peeled and cored and medium to coarsely shredded or diced.  Love Creek Orchards helps our family get their fruit quota deliciously.
  • one big sprig of fresh thyme
  • one medium to smallish bay leaf
  • some broth or stock, if you have any, or just water
  • leftover sausage skillet supper
  • up to 1 teaspoon turbinado sugar, or local honey, optional
  • fresh lemon, optional

Cut the radish leaves off and chop them up.  Give ’em a quick cold bath and drain them.  Quarter, halve, or sixth up the radishes, depending on their size.  Heat up your fat of choice in a large (12″) hot skillet.  Toss in the radishes and saute til browned.  If you’ve never browned brassicas before, prepare to smell the irresistible magic of the Maillard reaction.  Once your radishes are well-colored, toss in the leaves and continue to stir and cook.  The leaves will brown a bit, too.  Add the apple and herbs, give the mixture a few stirs, then add salt and a little liquid.  Cover the pan, lower the heat and cook until the radishes are tender.  Stir in the leftovers and sweetener if desired, and heat through.  Correct the seasoning (salt & pepper) and sparkle it with a little lemon juice.  If you forget about the lemon (did I do that?), it’ll be fine.

Serve with rice (there’s always a pot of cooked Lowell Farms organic jasmine rice in our fridge) or buttered noodles, or throw in a diced potato with the radishes.  Get to eatin’!


Dai Due–Bratwurst Brings on Dinner October 19, 2009

Filed under: Austin Farmers Market,Dai Due,easy,fast,meat — Austin Frugal Foodie @ 3:14 pm

Lucky downtowners!  Starting November 7, Dai Due plans to grace the Austin Farmers Market with their own boucher booth.  Using local and organic ingredients at every possible turn, these folks create honest sausages, pâtés, fresh lard and other meaty goodies to sink your sharp teeth into.  Treat yourself to their tasty and sustainably crafted charcuterie.

Thanks to Dai Due’s delicious Wurtenberg bratwurst, this quick dinner manifested the convenience of great sausage last night.  Satiated, every family member proclaimed this simple supper “superb”!

SAUSAGE SKILLET SUPPER serves several, plus leftovers

  • 2 Tablespoons high smoke point oil
  • 1 pound bratwurst–preferably from Dai Due.  The Wurtenberg is especially yummy because there’s bacon in it.
  • a couple of good sized onions, sliced up.  Local alliums are still available at our farmers markets.
  • a couple or so sweet peppers, stemmed, seeded and sliced.  I like Flintrock Hill‘s golden Anaheims.
  • a couple or more cloves of garlic, roughly chopped.  Morning Glory Farm keeps showing up with bulbs and Hairston Creek Farm has elephant garlic.
  • 3 medium potatoes, cut into bite-sized chunks.  Sprouts is selling 5# bags of organic russets for $2.99 through Wednesday.
  • a couple sprigs of fresh thyme.  My thymes have been enjoying the rainy weather lately.
  • bay leaf—grow your own!
  • 1 cup (or more as needed) of broth or stock, preferably homemade

Heat up your big (12″) skillet smokin’ hot, then add the oil.  Quickly swirl the pan and add the sausage links.  Get ’em browned on four sides and remove the sausages to a plate.  Add your onions and stir them for a minute.  Add your peppers and stir again.  Sprinkle in some salt and let the veggies soften, stirring occasionally.  Put in the garlic and give it a stir.  Add the potatoes and herbs, stir ’em around some and pour in the broth.  Bring to a boil on high heat, cover and lower the heat a bit.  Cook until the potatoes are done.  Add water or more broth if necessary.  Put the sausage back in, sliced or not, and poach until cooked through—don’t overcook.

Pepper up your helpings and serve with as much Full Quiver Farm’s lacto-fermented sauerkraut as you like—I like a lot!


Dai Due Didactical—Doin’ Deer!

Filed under: Dai Due,reviews — Austin Frugal Foodie @ 3:08 pm

Yes, those same fine folks that bring you dinner in the fields and divine charcuterie also conduct hands-on workshops in their commercial kitchen.  This past weekend’s tutorial topic…venison processing.

Chef Jesse Griffiths presented a dressed 60-pound axis deer, freshly field-harvested from Broken Arrow Ranch in Ingram,Texas.  Skinned, gutted and beheaded, and sporting several blue USDA stamps, the lean, fleshy beast tantalized students with visions of  venison victuals to come.  Chef and his assistant cut, carved and sawed through meat, bone and sinew to hew the hunk into cooking pieces.  And raw morsels—hand chopped deer tenderloin, well seasoned.  Venison tartare, indeed.

Students also enjoyed pan-fried leg meat, simmered, grill-glazed ribs and venison chorizo a la minute.  Innards not to be outdone, deer kidneys made their brash appearance, quickly fried and served with Hairston Creek Farm’s red pepper jelly (a lovely condiment).  My favorite preparation of the event, the venison and Richardson Farms pork kielbasa, succulently exceeded my expectations, compelling me to indulge in more than my fair share.  (And not just because I helped stuff the casings!)

Chef demonstrated several other cuts and techniques, to be served the next day at a farm site supper.  Stuffed rolled flank, brined venison loin, venison liver, kidney and pork pâté, and a neck and shank braise teased this teathered mother of two–for surely I’d turn into a pumpkin were I to attend events two days in a row!

Class participants didn’t go hungry, however.  Crusty bread and house-made pâté, mustard and chutney, accompanied by Bosque Blue cheese (Veldhuizen Family Farm) and Thunder Heart Buffalo jerky rounded out the offerings.

Chef clarified meat-cutting, venison-specific as well as in general, and provided plenty of instruction on dishing up your deer.  Armed with Dai Due’s thoughtfully composed guide, including a well-researched list of producers and excellent references for the conscious cook, this freshly inspired student is ready to meat the hunter’s challenge.


Saveur on the Lamb October 12, 2009

Filed under: meat,rice — Austin Frugal Foodie @ 2:28 pm
luscious layers

luscious layers

browned beauty

browned beauty

The current issue of Saveur magazine (October 2009, #123) offers a paean to luscious lamb flesh.  Given my long-standing love of lamb, I had to whip up a sheepy treat to show off Loncito’s grass-fed Texas lamb.  Available at both Sunset Valley Farmers Market and the Austin Farmers Market for $6.50 a pound (ground).

Unabashedly eggplanty, this dish won’t fool any aubergine-loathers.  But if, like me, you can’t get enough of those glossy globes, you’ll enjoy the unctuousity they bring to this casserole.

MOUSSAKA-ESQUE makes a 9″ X 13″ panful    I’d say that’s about a dozen servings

  • 3 good sized local globe eggplants—about 2 pounds.  Hairston Creek Farm is still selling the shiny, inky beauties.
  • 3/4 teaspoon ground turmeric
  • 1 ½ teaspoons kosher salt
  • plenty of olive oil, organic or local (Texas Olive Ranch)
  • 1/2 pound Kitchen Pride Texas-grown mushrooms, button or cremini cut in half and sliced.  You can find these at local grocery stores and at our farmers markets.
  • 1 pound ground local lamb.  Loncito’s and Premium Lamb will both work.
  • about 1 cup finely chopped onions.  You might be able to find local specimens right now.  I buy organic when my local sources dry up.
  • 1 big red bell pepper or a couple of ripe Anaheims.  I’ve been buying golden Anaheims from Flint Rock Hill lately and they’re sweetly good.
  • 6 garlic cloves, minced. This past Saturday, Morning Glory Farm was still offering local stinking roses.  Otherwise, I buy domestic organic.
  • 1/4 teaspoon or so red pepper flakes, according to your diners’ tolerance
  • 1 large bay leaf
  • 1 teaspoon paprika
  • 1/2 teaspoon ground cinnamon
  • 1/4 teaspoon ground ginger
  • 1/4 teaspoon ground allspice—I like to crush this up fresh in a tiny mortar & pestle.
  • 1 cup dry red wine.  Colosi, a delicious red from Sicily, is a good value.  I buy it at Central Market for $11.99 a bottle.
  • 1 28-ounce can organic diced tomatoes.  Sprouts is selling Muir Glen for only $2 a can.
  • 1 15-ounce can organic garbanzo beans.  Westbrae has been on sale at several stores lately, and both CM and WF sell their own brands for a good price.
  • 1/3 cup organic raisins, chopped
  • salt & pepper to taste
  • 4 Tablespoons organic butter
  • 6 Tablespoons organic all-purpose flour.  I buy WF 365 organic for the best price.
  • 2 ¼ cups milk.  I buy local goat juice from either Swede Farm Dairy (available at Sunset Valley Farmers Market) or Wateroak Farms (available at SVFM and Whole Foods).
  • 1 bay leaf
  • ½ cup yogurt.  I use homemade goat’s milk yogurt.
  • 2 local eggs
  • 1/4 teaspoon freshly grated nutmeg
  • 1 cup grated parmigiano reggiano

Cut your eggplants into lengthwise 1/3″ slices, cut the slices into strips and cut the strips in half, crosswise, into “batons”.  Toss the eggplant pieces with the turmeric and kosher salt and let sit, re-tossing now and then, while you get the mushrooms prepped.

In a very large—6-quart if you have one—saute pan (non-stick is helpful here) heat up about ¼ ” of olive oil on high heat until the oil starts to shimmer.  If your pan in smaller, fry the eggplant in two batches.  Make the second batch a little smaller than the first because you’ll be adding your mushrooms to it.  Add your eggplant batons to the oil and stir and fry until fairly browned.  Add your mushrooms and continue to stir and cook until the eggplant is tender.  Drain the whole mass in a fine sieve (I use a splatter screen) over a bowl, reserving the oil.

In the same pan, fry the ground lamb over medium-high heat, breaking up the clumps, until browned a bit.  Remove from the pan with a slotted spoon and place in a colander set over a plate or a bowl.  Remove all but a couple of Tablespoons of lamb fat from the pan.  I save this sheep grease in the freezer, to use in flatbreads.  Add the onions and peppers to the pan and saute on medium heat until softened.  Add the garlic and spices, through the allspice, and saute a minute.  Pour in the wine and simmer for a couple minutes.  Chop up the eggplant and mushroom mixture and add to the pan.  Add the next three ingredients, plus salt and pepper to taste (at least 1½ teaspoons salt) and cook on medium-low until thickened.  The timing will vary depending on the size of your pan, but expect at least 15 minutes of simmering.

In a 2-quart saucepan or saute pan (I like the larger surface area of the latter), melt the butter on medium heat.  Whisk in the flour and cook a couple minutes, whisking constantly, until smooth.  Pour in the milk gradually but steadily, whisking all the while.  Add your bay leaf and simmer, whisking frequently, until well-thickened and smooth, a few minutes.  Remove from heat, and let cool a few minutes.  Meanwhile, stir together the eggs and yogurt with a fork.  Season your white sauce with salt and pepper and the nutmeg, discard the bay leaf and whisk in the yogurt mixture.

Preheat your oven to 400º.  Brush some of the reserved olive oil (I save the rest, refrigerated, to saute veggies and lube up quesadillas) all over the inside and top edges of a 9″ X 13″ baking pan.  Spread the cooked rice on the bottom and top with the lamb mixture, spreading it evenly to the sides.  Depending on the depth and exact dimensions of your pan, you may find it quite full.  If you can’t safely pour in the bechamel (white sauce) without an overflow, remove a portion of the rice and meat.  You can feed the excess to the baby or the cook, whoever’s hungriest.  Carefully pour the white sauce all over the lamb mixture.  It’s OK if your bechamel brushes the top edge of the pan.  Sprinkle the cheese evenly over the sauce, place the pan on a baking sheet (to catch any possible overflow) and bake for 30 -50 minutes, until browned and bubbling all the way into the center.  Cooking time will vary depending on the temperature of your components.

Let the casserole cool for at least 20 minutes, to allow the layers to coalesce, before serving.

Baaaaaaaaaa!


Caked Crusader

Filed under: cake,dessert — Austin Frugal Foodie @ 1:17 pm
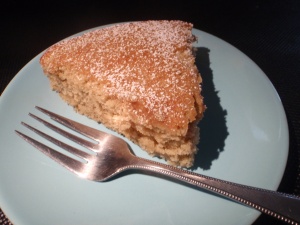
sweetly sprinkled with sugar dust

sweetly sprinkled with sugar dust

I recently ordered Rose Levy Beranbaum‘s brand new Heavenly Cakes book.  Although it’s yet to arrive, I’m already excitedly caking.  Here’s my newest cake recipe.  A full two-thirds whole grain, this formula nevertheless yields a soft and light layer, perfect with a touch of spice, or a blanket of buttercream.

LIGHT OATY LAYER CAKE makes one 9″ round

  • 4 ounces (1 stick) organic butter, softened but cool.  I like Organic Valley.
  • 200 grams (1 cup) organic sugar.  Central Market’s brand costs $2.99 for a two-pound bag.  If you do Costco, Wholesome Sweeteners 10# bag sells there for only $7.79.
  • rounded 1/8 teaspoon salt
  • 2 local eggs. Crack ’em, blend them a little with a fork and bring ’em to room temperature for a while.
  • 56 grams (about ½ cup plus 1 Tablespoon) organic oat flour.  I use Arrowhead Mills.  I don’t recommend grinding your own from oats for this recipe.
  • 56 grams (½ cup) organic whole wheat flour
  • 56 grams (about ½ cup minus 2 teaspoons) organic all-purpose flour.  Whole Foods usually offers the best price on their 365 brand.
  • 1 teaspoon plus a heaping ¼ teaspoon baking powder
  • 2/3 cup local milk–I love Swede Farm Dairy and Wateroak Farm goat milks, both available at Sunset Valley Farmers Market.  Whole Foods sells Wateroak Farm as well.  Take the milk out ahead to take the chill off.
  • 1 teaspoon vanilla extract
  • optional spicing (whisk into dry ingredients):  ¾  teaspoon ground cinnamon, ½ teaspoon ground cardamom, 1/8 teaspoon freshly grated nutmeg, 1/16 teaspoon ground cloves

Preheat your oven to 350º and grease up your 9″ round pan–you’ll need at least a 2″ deep vessel for this batter.  Lately I’ve just been oiling my pans with organic virgin coconut oil (use a brush or even your fingertips).  Makes ’em smell like a bakery.  Line the bottom of the pan with a round of waxed paper, parchment or a reusable non-stick liner and dust the pan with flour.  I like the non-stick liners.  I bought two pair of rounds (8″ and 9″) at Big Lots years ago and I just throw them into the (clothes) washing machine to clean them.  Air dry them, of course!

Using a stand mixer (my recommendation), hand mixer or wooden spoon if you’re up for a workout, cream the sugar gradually into the butter on medium high speed until light and fluffy.  For the lightest texture in your finished cake, don’t undermix.  With your mixing apparatus running, gradually beat in the eggs, scraping down the sides of the mixing bowl as necessary to homogenize the ingredients.  Whip for half a minute to blend up the batter light and smooth.  Using a lower mixing  speed, add the flour mixture in three parts alternately with the milk, beginning and ending with the dry ingredients.  Scrape the sides of the mixing bowl and blend the mixture together with your flexible spatula before turning out into the prepared baking pan.

Bake for about 35 minutes, until a toothpick or bamboo skewer (washable and reusable!) inserted into the center of the cake comes out with moist crumbs attached, but not raw, wet batter.  Let cool in the pan on a rack for 5 minutes before carefully running a metal spatula around the edge to loosen the sides, and unmolding the cake.  If I’m not frosting the layer, I usually prefer to re-right the cake and serve it top side up.  When I’m frosting or glazing a cake, I often choose to show off the flatly perfect bottom.  You choose!


Whole Foods Coupons October 8, 2009

Filed under: coupons,whole foods — Austin Frugal Foodie @ 10:08 am

Picked up the Whole Foods whole deal coupon newsletter recently (it’s available at the store).  Coupons I’ll be redeeming include: 75¢ OFF any Dagoba or Scharffenberger product, 75¢ OFF any Thai Kitchen product (I frequently use their fish sauce), $1 OFF any Green & Black’s product—I LOVE their 70% dark chocolate bar, $1 OFF any Organic Valley butter, $1 OFF any two Organic Valley cream cheese, sour cream, cottage cheese, ricotta or whipped butter, 75¢ OFF Organic Valley whipping cream or ½-n-½, and possibly $2 OFF Spectrum organic olive oil.  Get more green for your green!